Emerald diamonds flower ring in 18K, designed and made by George Postgate https://postgatejewelers.com
The emerald diamonds flower ring is a commission that I just completed. I made it for a customer who has purchased several custom pieces over a period of about 45 years. This is a very special ring that may be the last that I get to make for her. We spent a lot of time working out details and deciding which stones to use. We finally chose an emerald for the ring's center and to surround it with 18 diamonds. She wanted the ring to really have some sparkle. If you would like to see some other custom pieces we've made for our customers please follow this link: https://postgatejewelers.com/special-order-jewelry/
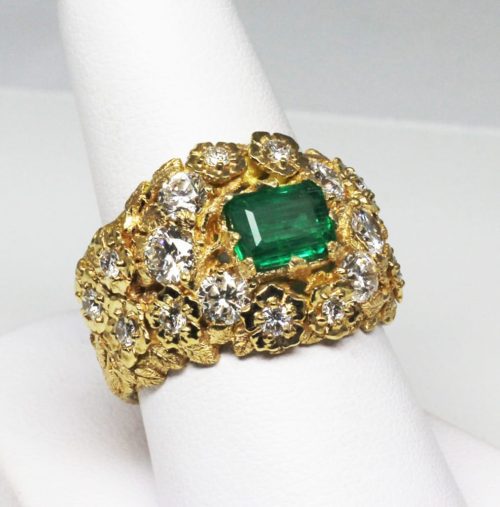
Emerald diamonds flower ring, Details:
The ring was hand carved in wax and then cast in 18K gold. The emerald is a fine natural stone that weighs 1.43 cts, it measures 7 X 9 mm and has fine color and clarity. Fine clarity in emeralds is a bit different from other stones. Emeralds almost always have inclusions and other flaws. Stones that are considered "fine" will usually have some, as this stone does. The diamonds are SI1 in clarity and G-H in color. Twelve diamonds are set into the centers of flowers around the emerald and flow down the rings sides. Six larger diamonds, two 0.24ct and four 0.15ct stones also surround the emerald.
How I made it:
My customer was very curious about how I was making her ring? I decided to send her images as I worked on it. I also gave her explanations so that she could understand the images. Then I realized that many of our friends, customers, and budding jewelers might be interested as well. I've attached the images and information in the following sections of this post for those of you who are interested. They will take you from the initial wax to the finished ring. I hope that you will find this interesting and informative.


Emerald diamonds flower ring making the wax model:
The first image on the left shows how I begin a new wax ring from scratch. I first draw two fairly thick lines of wax around the mandrel to define the borders of the ring. This is done by picking up a droplet of wax with a hot wire tool and drawing it out on the mandrel. The mandrel is a tapered hollow metal rod that has ring sizes stamped into it. This allows me to get a precise size. I then transfer the wax to a short mandrel that is not tapered, and is easier to handle.
I've wrapped graph paper around the mandrel to shim it to the right size. The paper also gives me a guide, to help me shape and detail the wax. I've used wax wires to create the vines and I have started making the leaves. You can see how the details are very rough and undefined. I'll move things around until I feel that the vines are starting to look natural and alive.
The second image is much better organized. I've begun to detail some of the leaves and find the best locations for the stones. There are openings in the design where I want to place the flowers. The flowers will cover parts of the vines and leaves and give the design depth. They also need to be set low so that they aren't felt.
Finishing the wax:
The third image shows a couple of the diamond centered flowers tacked in place to find their best positions. I will remove and replace them several times to get their positions right. This also allows me to detail the vines and leaves that they will partially cover. I want to give the flowers and vines a three dimensional and natural appearance without making the sides of the ring stand out too much.
The fourth image shows the top of the setting, notice the vines and leaves on either side of the emerald. I've detailed them and will place flowers over the leaves and vines soon. The flower centers will have to be opened up so that I can firmly attach them to their bases. This means that much of the detailing I've done will be lost. I can't predict exactly how much will be lost, so I've detailed everything. The emerald is set so that its sides are somewhat exposed through the flowers and vines. This will allow its beautiful color to be seen through its setting.


Finishing the wax and removing the stones:
The first image shows the wax completed. I've finally placed all of the stones where I want them and I've finished detailing around them.
The second image shows the flowers that I made for the ring waiting to be placed in the wax. They were made part of the wax model at first, so that I would know how big to make them. I then cut them off and improved their detailing. It is easy to do more damage than good when working on waxes because the heat from your fingers softens it. Any careless touch can remove the details you've worked hard to create. A wooden stick attached to the waxes allows me to carve and detail them and not touch them too often.
The third image shows the top of the ring completed.
The fourth image shows the wax with all of the diamonds removed. I now have to check each prong and make sure that it is firmly attached. Any cracks between them and the settings might make them fail to cast or break. I also have to make sure that the prongs are just right in thickness, not too thick or to thin.


Emerald diamonds flower ring, Sprued and ready to cast:
When the ring is ready to cast it will be a negative space within a plaster mold. Getting it to fill with gold requires an opening for the gold to fill the mold. Sprues, provide the opening that the molten gold needs. The red wax wires that hold the wax ring in place are the sprues. The ring could probably be cast just using one sprue, but I'm being very cautious. I have a lot of time invested in this piece and I don't want it to fail. There is an added benefit to the way I've sprued the ring as well. Metal shrinks as it cools from a liquid to a solid. If there isn't a source of metal to pull from, the cooled metal will have holes or gaps in it. The heavy sprues don't only provide a pathway for the molten gold to fill the mold. They also stay liquid longer than the ring and provide a reservoir to pull metal from. This helps insure that there won't be any holes in the casting.
The blue thin wax wires are vents. Once the wax has been burned out, the plaster is porous enough for the atmosphere within to be pushed through it as the metal enters. This means that vents aren't always needed. I've used the vents to make sure that gold fills even the thinnest details. They also help improve the metal's density. I've joined the vents together into one on either side to help the escaping gases to leave the mold.
The third image shows the wax attached to the sprue base. The base is made of rubber. It has a conical shaped form in its center that the sprue is attached to. This will form a funnel shaped depression in the center of the plaster mold through which the metal will enter. The vents exit on either side of the funnel.
The fourth image shows the flask that covers the wax in and fits into the rubber base. The flask has been filled with plaster which now encases the wax. I've left out the investing of the flask, so I will try to explain here. If you look at a straw in liquid, you'll notice that it is covered with tiny bubbles. The same happens to a wax when it is covered with plaster. These bubbles will become trapped in the plaster and become part of the casting. They will cover your piece with solid metal spheres that you will have to remove. This can be avoided by placing the flask into a vacuum chamber while the plaster is still liquid. The flask is placed under vacuum and those small bubbles become so large that they burst out of the plaster. any remaining bubbles become so small that they can't be seen once the vacuum is released.


Casting:
The next four image shows the "business end" of the flask and see the funnel opening for the gold. If you look closely you can see the two tiny ends of the vents, one just above the red mark. That mark shows where the heaviest part of the ring is. I can use it to position the flask so that it will fill best.
Suzan and I cast pieces that require different flask sizes. Here you can see the flask resting in a metal cradle at the end of the casting machine's arm. I've separated the flask from the crucible so that you can ( barely ) see how they fit together. The crucible has a nipple that fits into the funnel of the flask. I will melt the gold in the crucible and it will be "cast" into the flask. At this point I am just making sure that everything fits together properly.
The third image shows the casting machine's arm fully. There are adjustable weights on its opposite end to counter balance the flask and metal. The arm is hinged so the flask can be positioned in line with the movement of the arm as it begins to spin. The arm is attached to a spring that provides the power to make the arm spin. I've posted a video of this flask being cast on Facebook for you to see. Just follow this link. I've also posted the quenching of the flask: https://www.facebook.com/111540785537658/videos/1138178163362599
The fourth image shows the flask in the burn out oven where it has been soaked in 1350 degrees F for several hours to vaporize the wax. Wax isn't the only thing that can be burnt out and cast this way. most plastics, wood, and even insects and spiders, can be burned out and cast in metal this way.


Finishing the casting
The first image shows the casting after it has been "pickled" in acid to remove oxidation. As you can see the casting came out great. Notice the cracks in the sprue near its base. This is where metal was drawn from to supply the ring as well as its "button" which is the thick metal at its base, as they cooled and shrank.
The next two images show the casting after I've worked on it to improve its detailing and to ready it for its stones.
The last image is of the ring finished. I hope that those of you who followed this to its end have enjoyed and found it worth while?